
project:
run openvpn for myself on my colocated raspberry and *drumroll* add ipv6 transport :)
manual is stolen from the fine people at n0where.net
https://n0where.net/openvpn-raspberry-pi/
this is the manual how to run it on a raspberry 1b using raspbian wheezy
Step 1
To be able to install the latest program versions we should update our packet sources:
sudo apt-get update
Step 2
Now we are installing Open VPN and OpenSSL.
sudo apt-get install openvpn openssl
Step 3
We are switching to the directory and paste a directory we will be needing later into it.
cd /etc/openvpn
sudo cp -r /usr/share/doc/openvpn/examples/easy-rsa/2.0 ./easy-rsa
Step 4
Now we open the file easy-rsa/vars with nano and apply some changes.
nano /easy-rsa/vars
export EASY_RSA=”`pwd`”
export EASY_RSA=”/etc/openvpn/easy-rsa”
Step 5
We change the directory, log in as root user and execute some configurations.
cd easy-rsa
sudo su
source vars
./clean-all
./pkitool –initca
ln -s openssl-1.0.0.cnf openssl.cnf
Step 6
Now we are able to generate the components for the encryption of Open VPN. After the first input you will be asked for the abbreviation of your country (US = USA, DE – Germany, AT = Austria, CH – Switzerland). All other inputs can simply be confirmed.
./build-ca OpenVPN
./build-key-server server
./build-key client1
Step 7
The calculation of the last components can take a few minutes.
./build-dh
exit
Step 8
We have to switch the directory again and create the file openvpn.conf with the following content:
cd ..
sudo touch openvpn.conf
sudo nano openvpn.conf
dev tun
proto udp
port 1194
ca /etc/openvpn/easy-rsa/keys/ca.crt
cert /etc/openvpn/easy-rsa/keys/server.crt
key /etc/openvpn/easy-rsa/keys/server.key
dh /etc/openvpn/easy-rsa/keys/dh1024.pem
user nobody
group nogroup
server 10.8.0.0 255.255.255.0
persist-key
persist-tun
status /var/log/openvpn-status.log
verb 3
client-to-client
push “redirect-gateway def1”
#set the dns servers
push “dhcp-option DNS 8.8.8.8”
push “dhcp-option DNS 8.8.4.4”
log-append /var/log/openvpn
comp-lzo
You can change the DNS-servers to any DNS you like.(openDNS?)
Step 9
Now, create the internet-forwarding for the CPN clients. If you are not using an ethernet-cable (e.g. Wifi) you will have to replace “eth0″ with the name of your network device.
sudo sh -c ‘echo 1 > /proc/sys/net/ipv4/ip_forward’
sudo iptables -t nat -A POSTROUTING -s 10.0.0.0/8 ! -d 10.0.0.0/8 -o eth0 -j MASQUERADE
Step 10
One of the final steps will be to delete the “#” before net.ipv4.ip_forward=1 in sysctl.conf.
cd ..
sudo nano sysctl.conf
Step 11
A part of the above settings have to be endorsed as a crontab to work permanently. Insert following line at the end of the crontab file (replace “eth0″ if you did above):
crontab -e
@reboot sudo iptables -t nat -A POSTROUTING -s 10.0.0.0/8 ! -d 10.0.0.0/8 -o eth0 -j MASQUERADE
Step 12
Again change to the root-user and to the directory /etc/openvpn/easy-rsa/keys in which we will create the file raspberrypi.ovpn and fill it with the code of the second paragraph. RASPBERRY-PI-IP should be replaced by the IP address of your Pi or, if you are using a DynDNS service, by the given domain.
sudo su
cd /etc/openvpn/easy-rsa/keys
nano raspberrypi.ovpn
dev tun
client
proto udp
remote RASPBERRY-PI-IP 1194
resolv-retry infinite
nobind
persist-key
persist-tun
ca ca.crt
cert client1.crt
key client1.key
comp-lzo
verb 3
Step 13
Now create a packet with all the needed files for the client, which we will place in /home/[user] and give the user pi the needed rights to the file.
tar czf openvpn-keys.tgz ca.crt ca.key client1.crt client1.csr client1.key raspberrypi.ovpn
mv openvpn-keys.tgz /home/[user]
chown user:user /home/[user]/openvpn-keys.tgz
exit
Step 14
Restart the server.
sudo /etc/init.d/openvpn start
Finished!
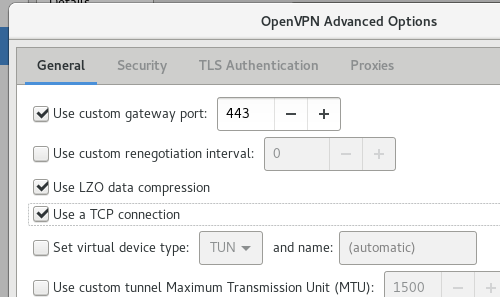
now import the certificates, the .ovpn file and enable LZO compression in gnome/network-manager and it should work out of the box.
Interesting project: Stop censorship and become unstoppable by running on port 443 and TCP instead of UDP and port 1149 (which is the default)
in /etc/openvpn/openvpn.conf change
proto udp
port 1194
to
proto tcp
port 443
restart the openvpn daemon, do the same in your .ovpn file (on your mobile/laptop) and you will look just like another browser :)
in the mobile client the ovpn file needs editing, in gnome-network-manager (whatever this is called) you need to set it up manually:
now for the IPv6 part: (pending.. get your lazy ass to the hackspace and fix it already!)
sources:
https://community.openvpn.net/openvpn/wiki/IPv6
http://silmor.de/ipv6.openvpn.php
https://www.sparklabs.com/forum/viewtopic.php?t=1381
https://www.digitalocean.com/community/questions/openvpn-ipv6-works-only-in-local-network