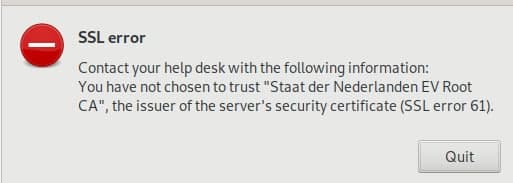
Mother should I trust…

fun error message that I received today.. citrix related (on Ubuntu 20.04, official citrix receiver install.. or workspace as it’s called now)

turns out the cert is valid, it’s just citrix looking in the wrong places. A simple symlink to the firefox cert store fixes this problem:

sudo ln -s /usr/share/ca-certificates/mozilla/* /opt/Citrix/ICAClient/keystore/cacerts

and another fix for a problem that I don’t really understand… :-/

automated Plex backup 2019 style

2019 – ubuntu is now using systemd (18.04LTS), my home server is running a ryzen processor, CIFS is almost as fast as NFS now and the automated rsync jobs have stopped.
Time to re-build them!
Note: This is a closed system, I am not taking care of security here much as my network is considered “secure” – this is probably not going to win many security awards

Step 1: Networking

Ubuntu 18.04 uses systemd and netplan so no more hacking around /etc/network/interfaces. The config is in /etc/netplan – the default file is 50-cloud-init.yaml

network:
version: 2
ethernets:
enp2s0:
dhcp4: false
addresses:
- 10.0.0.2/24
mtu: 9000

and apply the settings with sudo netplan apply
and verify withip addr
ST,UP,LOWER_UP> mtu 1500 qdisc fq_codel state UP
however, this did not bring the mtu to 9000 so we need another thing:
> sudo ip link set mtu 9000 enp2s0
and from what I hear this may not be transitory / survive reboots.. in that case it needs to go into the startup scripts.
Anyway: that’s what I wanted:
enp2s0: MULTICAST,UP,LOWER_UP> mtu 9000 qdisc fq_codel state UP

Step 2: Mount the NAS

verify shares are working (NFS and CIFS)

andreas@plexcloud:/$ showmount -e 10.0.0.1
Export list for 10.0.0.1:
/shares/public *
/shares/andreas *
andreas@plexcloud:/$ smbclient -L //10.0.0.1 -U andreas
WARNING: The "syslog" option is deprecated
Enter WORKGROUP\andreas's password:
Sharename       Type      Comment
---------       ----      -------
public          Disk      public
andreas         Disk      Andreas sein Zeug

try to mount is manually: (as root because I will mount using fstab later)

root@plexcloud:~# mount -t cifs -o username=andreas,password=xxxxxxxxxxxx,iocharset=utf8,file_mode=0777,dir_mode=0777,soft,user,noperm,vers=1.0 //10.0.0.1/public /mnt/NAS/

root@plexcloud:~# ls /mnt/NAS
[data]

actually. it’s 2019.. I changed my mind wrt fstab.. let’s use automount (As I never know if my NAS will be up or not while I move to my new place)
https://help.ubuntu.com/community/Autofs <<< that’s supposed to be easy?

apt install autofs
edit /etc/auto.master and add the line
/mnt /etc/auto.smb
(which should tell autofs to look at /etc/auto.smb and perform its magic in /mnt) – basically mounting SMB shares in the /mnt directory. CIFS would be a better way.. which doesn’t work for me.. so it’s the manual mode for me for now

for the lazy me: edit fstab and add:
//10.0.0.1/public /mnt/NAS/ cifs username=YOURUSERNAME,password=YOURPASSWORD,iocharset=utf8,file_mode=0777,dir_mode=0777,soft,user,noperm,vers=1.0
vers=1.0 is to bypass the “host is down” error (assuming proper authentication should be used) and the rest is to bypass said authentication and not to fuck around with file permissions (just behave like a fucking USB stick, damn it.. no one else is using you!)
yeah, I know.. “guest” would probably work, too.. but I had bad experiences with permissions afterwards.

so now I have a mountpoint, let’s do backups!

Step 3: test and automate rsync jobs

motivation: rsync with delete – whatever I delete from the source can be deleted on the backup, too
full sync for the server directory, only check by size for the media files
I like -v and “–progress” as it gives me an indication what is going on (on the first run…)
however not in the scripts, a simple –stats will have to do, there…

so for the server backup:
rsync -ahv /var/lib/plexmediaserver/ /mnt/NAS/backups/plexmediaserver/ --progress --delete --stats --dry-run
non-verbose and “live” mode:
rsync -a /var/lib/plexmediaserver/ /mnt/nas/backups/plexmediaserver/ –delete

(I removed the -z because the data dir is 7 GB and the compression too too long on that stupid atom-based nas)

and for files:
rsync -ahv /plex/ /mnt/NAS/plex/ --progress --size-only --delete --stats --dry-run
and non-verbose:
rsync -aq /plex/ /mnt/NAS/plex/ --size-only --delete

first version of the script used copy but this took AGES to finish so rsync all the way now. After all it seems my old seagate NAS does rsync :D

the /var/lib/plexmediaserver dir still takes way too long.. so I will tar and zip it and rsync it over instead – much faster – also –delete-source-files is handy (as mv can not overwrite and I don’t feel good calling rm -rf in a script executed by root….)

tar -zcvf plexmediaserver.tar.gz /var/lib/plexmediaserver/

finished script: added to crontab

0 4 * * * cd /home/andreas && sh backup_plex.sh>>plex_backup.log

#!/bin/bash
echo "+++stopping plex media server"
systemctl stop plexmediaserver.service
sleep 5
echo "+++backing up server and cache"
#rsync -ahz /var/lib/plexmediaserver/ /mnt/NAS/backups/plexmediaserver/ --stats --delete
tar -zcf /opt/plex/plexmediaserver.tar.gz /var/lib/plexmediaserver/
echo "+++copying tarball over to NAS"
#rsync -ahv /opt/plex/ /mnt/NAS/backups/plex/ --remove-source-files --progress --stats
rsync -ah /opt/plex/ /mnt/NAS/backups/plex/ --remove-source-files
echo "+++restarting plex media server"
systemctl start plexmediaserver.service
echo "+++server backup complete - now for the files"
#rsync -ahv /plex/ /mnt/NAS/plex/ --progress --size-only --delete --stats
rsync -ah /plex/ /mnt/NAS/plex/ --size-only --delete
SDcard format

when you need to format a sdcard for windows (phone) in linux:

sudo mkdosfs /dev/sdc1 -s 64 -F 32

-F is filesystem (32 is vfat/FAT32)
-s is the allocation size multiplier (for disks < = 16 GB it's usually based on a sector size of 512byte) how to find out sector size? fdisk! root@lando:~# fdisk -l /dev/sdc1
Disk /dev/sdc1: 1.9 GiB, 1973416448 bytes, 3854329 sectors
Units: sectors of 1 * 512 = 512 bytes
Sector size (logical/physical): 512 bytes / 512 bytes
I/O size (minimum/optimal): 512 bytes / 512 bytes
Disklabel type: dos
Disk identifier: 0x00000000
root@lando:~#

16×512 = 4K allocation size (standard for small cards)
64×512 = 32K allocation size (Lumia Phones from 4 – 32 GB)
(larger cards (64 GB and up) need exFAT and 128 kB allocation size for Lumia)

NOTE: for larger sector sizes you have to change the formula accordingly

5 things for better security

following the Snowden events here is what everyone can do to increase privacy/security and prevent man-in-the-middle attacks:

– tor
– otr encryption / GPG email / chatsecure / signal
– password manager and a strong password policy
– 2-factor authentication
– full-disk encryption

Continue reading

centOS 7 install log

after my last server install I realized a lot of things were improvised and broken, also there were no new binaries for owncloud on Ubuntu 12.02 and no disk encryption and no systemd and so on and as I want to learn something I wanted to match it with my new love for Fedora so it became a Centos7 server.

basic vmware install using vSphere I found the first bug: using full disk encryption I cannot boot anymore

reason is a known bug

At the GRUB boot menu, press e to edit the boot config and remove rhgb.
then disable it permanently by removing rhgb in /etc/default/grub and execute grub2-mkconfig -o /boot/grub2/grub.cfg to update your boot grub.cfg.

next thing was I could not enter the passphrase using the vSphere console as characters were autorepeated.

Solution via VMware

  1. Power off the virtual machine.
  2. Add a line, similar to this, at the end of your virtual machine’s configuration (.vmx) file:
    keyboard.typematicMinDelay = “2000000”
    The delay is specified in micro-seconds, so the line in the example above increases the repeat time to 2 seconds. This should ensure that you never get auto-repeat unless you intend it.
  3. Power on the virtual machine.

that out of the way I could boot up CentOS and update it and install vmware tools

yum install net-tools perl
mount /dev/cdrom /mnt/cdrom
cd /tmp
tar zxf /mnt/cdrom/VMwareTools-5.0.0-<xxxx>.tar.gz
umount /dev/cdrom
cd vmware-tools-distrib
./vmware-install.pl

Now, let’s get started.
First get EPEL started (Extra Packages for Enterprise Linux)
yum install epel-release

enable UTF-8 support
edit /etc/environment and add this:
LC_ALL=en_US.UTF-8
LANG=en_US.UTF-8

also use ‘localectl’ to show and set a different locale
like this:
localectl set-locale LANG=en_US.utf8

colorize bash:
add this to .bash_profile
export LS_OPTS='--color=auto'
export GREP_OPTIONS='--color=auto'
export TERM=xterm-color
#export GREP_OPTIONS='--color=auto' GREP_COLOR='1;32'
export CLICOLOR=1

install Mosh
yum install mosh htop
then allow UDP for ports 60001-60010
sudo iptables -I INPUT 1 -p udp --dport 60001:60010 -j ACCEPT
so in systemd this will be:
– create /etc/firewalld/services/mosh.xml

< ?xml version="1.0" encoding="utf-8"?>

MOSH
Mosh (mosh.mit.edu) is a free replacement for SSH that allows roaming and supports intermittent connectivity.

– firewall-cmd –add-service=mosh –permanent
– firewall-cmd –reload
Note: In Fedora21+ this is already present (the xml file for mosh)
this will open 10 ports but that should be more than enough for me.
and start mosh as a server using “mosh-server” – defaults should work fine!
I am not even sure this is needed.. as long as mosh is installed on the server it should connect via SSH and start mosh and hand over the connection!

htop
yum install htop

fail2ban
yum install fail2ban
then make a copy of /etc/fail2ban/jail.conf and save it as jail.local
there set at least this:
[sshd]
enabled = true

enable and start service
systemctl enable fail2ban
systemctl start fail2ban

check journalctl for selinux related issues but this should be fixed now
journalctl -lfu fail2ban

install basic developer tools (build-essentials)
yum groupinstall 'Development Tools'

DNS caching resolver for home

Preface: the fortigate I am using at home sucks at DNS – in fact it sucks at many things when you are used to a FritzBox – but I am stubborn and I will do this because I work with fortigates and want the learning experience. (and because I am stubborn)

somehow the big models can all do forward DNS services but the FortiWifi40C somehow can’t even act as a DNS gateway / proxy without bringing the internet experience to a grinding halt here.
(I run a small network, about 5 devices and 4 mobiles and if I can feel it I don’t want to know what a small office will experience…)
But: I have this Raspberry that receives audio via zeroconf and is connected to the network and to my amplifier.
Why not have it act as a caching DNS resolver, too?
Continue reading

ipv6 between fortigate and fritz box

EDIT: AVM is not parsing /var/flash/debug.cfg anymore :(

so it turns out the IPv6 ready devices AVM fritz box 7360 and FortiWifi 40c are not so IPv6 ready as they claim they are…

both can not handle prefix delegation so I have to hack static routes to make it work.
(I tried it all, it seems the fritz’s firewall blocks IPv6 when it was assigned via dhcp6 (“adminstratively prohibited” even when Prefix delegation is enabled and the firewall is set to “exposed host”)

so let’s do it the hard way:
Continue reading