
So, lucky me got his hands on a shiny qnap NAS with a ryzen processor and M.2 SSDs next to spinning disks so I can run everything on that box.
Of course re-installing Plex is annoying and takes way too much time so let’s see if we can do this smart.
I am using the official Plex manual and the post at dachs.blog as reference here (next to 10 years of experience and pain on my end when it comes to metadata failure)
DISCLAIMER: despite some angry shouting from a few security conscious nerds in the forums, it seems that Plex is still running with admin privileges on the QNAP so if you intend to access your NAS from the internet, doing the following is probably NOT a good idea. You should/could containerize plex or put it into a VM and create a proper perimeter but the default installation will use Admin privileges and 777 for all files.
You have been warned. /DISCLAIMER
Install plex media server
simple. Via App Center (plex is there but sometimes 1 or 2 versions behind) or manual install – QTS 4.3 and better run Intel/x64 images so that’s a no brainer.

If you have SSDs make sure you install on them, if possible use a SSD RAID. Plex produces a LOT of small files. (450000 on my system). Running Plex server on your NAS disks will NOT perform well.
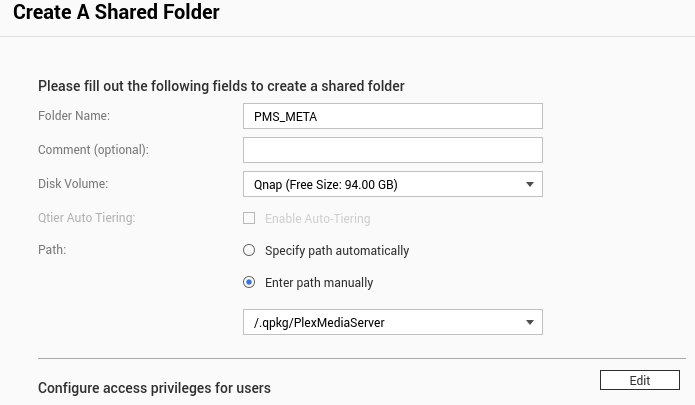
After install, plex will live in the directory /.qpkg/PlexMediaServer on your system volume.
Stop the server immediately – like, before you claim it.
For the rest of this install I will assume the following:
- SSD backed install of System/QTS and all VMs, Apps and Containers will run from SSD
- HDD backed storage pool will be used for the media exclusively (protip: encryption)
- shares will be created to move data over with rsync from a linux machine. if you come from Mac or Windows you’ll have to find your way (but the system should work the same on all platforms, see here
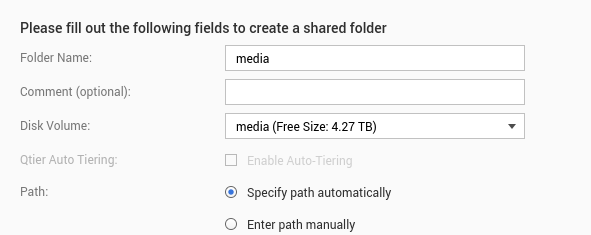
Create shares
So we want one share for the media and one for the medadata. Via Settings > Privilege > Shared Folders this can be achieved.
First one is for the metadata, we can kill/disable this later but it is needed for rsync
second one is for the media – in that case the path is irrelevant, just point it to the volume.
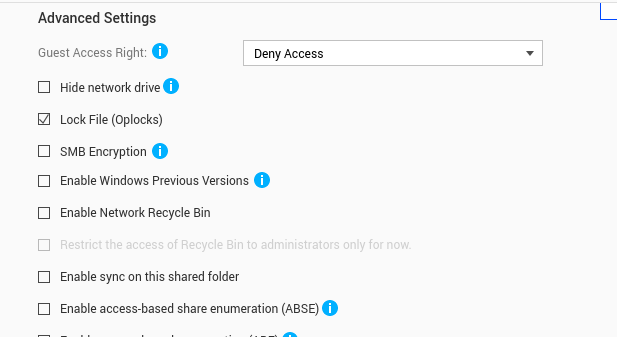
Important: for both shares, disable “Windows Previous Versions” and “Network Recycle Bin”. Useless overhead for our purposes.
you should be able to access the shares via SMB and SSH now. Test it. WinSCP or Nautilus connect > ssh://[QNAP_IPADDRESS] and smb://[QNAP_IPADDRESS] (log in as admin or – if you are a “good user”, the proper credentials for this share)
Shut down, clean up and move data.
Preparation: On your source Plex Media Server, you’ll want to disable the “Empty trash automatically after every scan” preference for the Server. (under Settings > Library)
On the destination system, sign out of your account under Settings > Server > General in Plex Web App and (if you have not done it before) stop the server using QTS AppCenter > PlexMediaServer > Stop
Access the share and rename the directory “Plex Media Server” (inside /share/PMS_META/Library) to something else (like add -OLD to it or whatever) – important is, that you save the file “Preferences.xml” inside it.
Copy/rsync all media over to the destination system – I used rsync for this, make sure you test using the –dry-run flag before you mess up your shares beyond repair. Oh. and mind trailing slashes when playing with Linux shares ^ ^
rsync -ahv /media/plex/ admin@[QNAP_IPADRESS]:/share/media --progress --stats --dry-run
not using -z because on my network this has no speed benefit. Maybe with 256k lines it will? Also I enable -v and –progress so I can see what is happening. This can take hours, if not days.. so run it in a screen session or make sure your connection is not interrupted.
same for the metadata. Note the missing / at the end of the source? This is because on QNAP there is no folder “Application Support” and the data has to go directly into “Library/Plex Media Server” – so far this is the only difference between Linux Plex and QNAP
rsync -ahv /var/lib/plexmediaserver/Library/Application\ Support/Plex\ Media\ Server admin@[QNAP_IPADRESS]:/share/PMS_META/ --progress --stats --dry-run
Start the server again. (QNAP AppCenter > Start). Claim the server if you haven’t done so. The libraries should show up but should not work, yet. so let’s fix this
Fix the library locations
Sign Out and Back in to the Server
Under Settings > Server > General in Plex Web App, sign out of the server (if you’re signed in) and then sign back in. This will update connection information for your apps to use and will also ensure you have a valid certificate to make use of secure connections.
Edit Your Libraries
In order to update the content location for your media, you’ll need to Edit a library and then add the appropriate folder for where your content is located on the destination system. Leave the existing/previous folder location in there for now.
QNAP filesystem should show your media share > add it to the existing drive. Save and plex should start associating the media with the new location. If it doesn’t, hit the “Scan Library Files” button.
You’ll need to do this for each of your libraries, but you should complete the full process here for a single library before proceeding to do the process for the next library.
Once everything works, remove the old locations.
Final Maintenance
You can do some final maintenance to clean things up and ensure your server is running as quickly as possible. Perform the following library actions, in this order (and wait for them to complete before proceeding to the next):
- If you originally disabled the Empty trash automatically after every scan Library, you can turn that back on
- Empty Trash for the server
- Clean Bundles for the server (wait at least a couple of minutes even after the dialog box goes away before proceeding)
- Optimize Database for the server
- Fix eventual manual port forwarding / NAT that you might have set up. Test under “remote access”
Hints/Stuff that I came across
- An installed nvidia GPU needs to be set to “QTS” mode if you want Plex QPKG package to utilize it for transcoding. (System > Hardware > Hardware Resources)
- After first install – to claim the server > replace https:// with http:// (modern browsers don’t like http:// connections.)