Taming AI in Android

couple of things because I am bored of searching them every time my phone gets updated and google tries to shove AI stuff down my throat again. So let’s tame Android AI.

Note: this is based on Xiaomi HyperOS 2 and the diffuculty increases with each step but don’t be afraid.. it’s only yours after you have voided the warranty! :)

1 – The digital assistant / Power Button shortcut

Currently there is a trend (android 14/15) to launch the digital assistant instead of powering off your phone. That’s easy to fix.

go Settings > Additional settings > Gesture shortcuts > Launch digital assistant

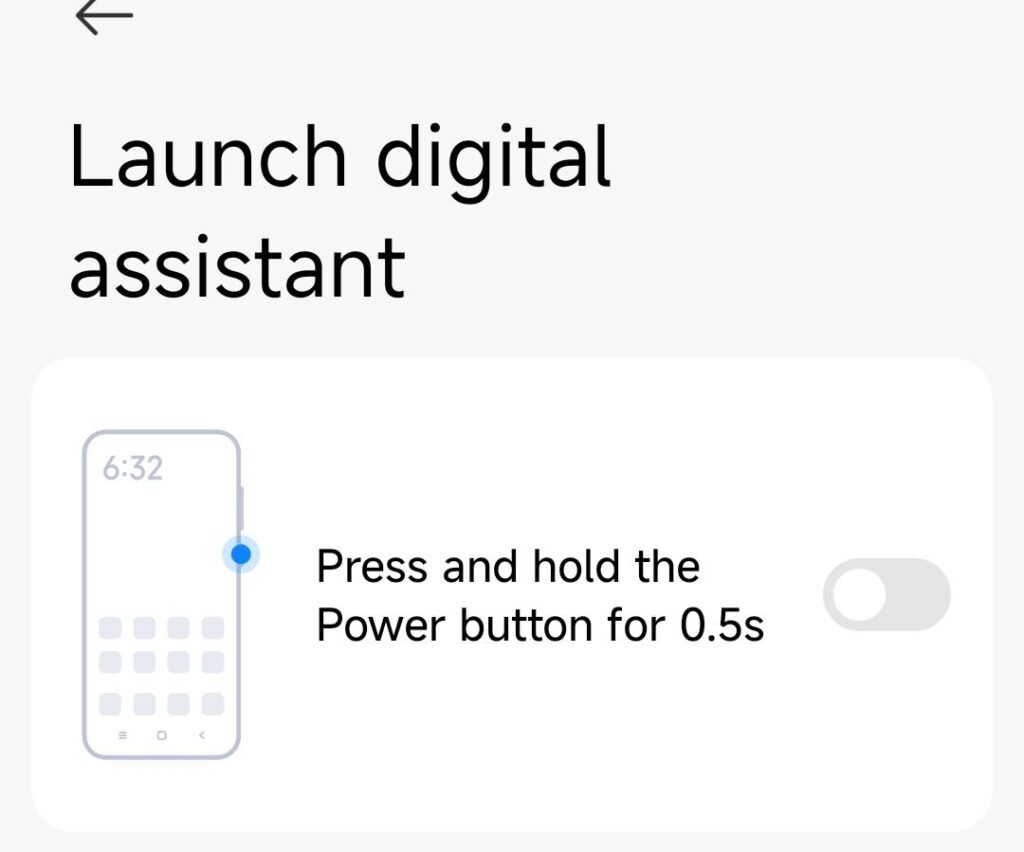
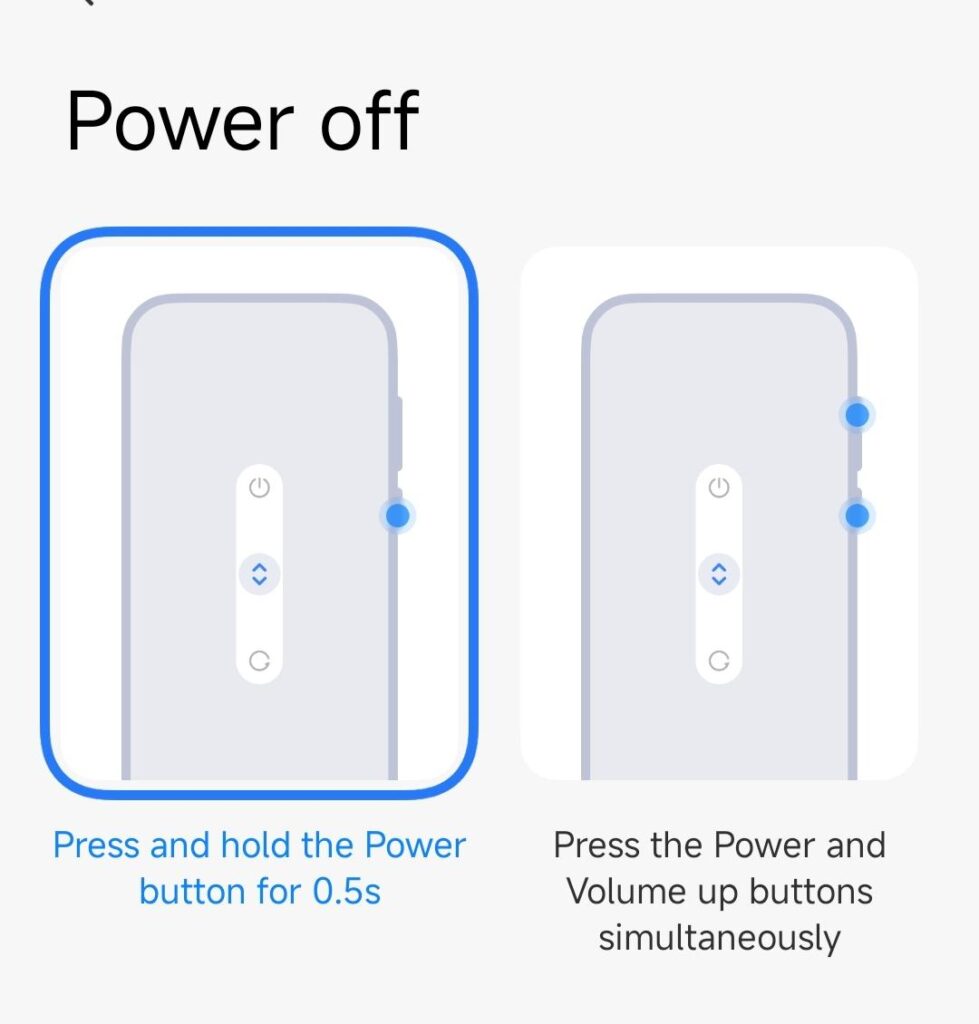
while disabling the digital assistant shortcut there, you might also want to enable power off when pushing the power button.. because that’s what a power button is supposed to do? Damn I’m old for demanding this kind of stuff….

2 – circle to search / invoking AI

I may actually want to keep that one.. but I keep accidentially triggering it and then.. everything that is on my screen at that very moment gets sent to google’s datacenter for analysis.. useful when you want to learn what you are looking at but can be a big privacy risk. use at your own discretion. Here is how to disable it.

Under Settings > Home screen > System navigation. Choose if you are using gestures or virtual buttons. depending on your choice, set up what holding down the home button or the fullscreen indicator does. If you disable “circle to search” it won’t pop up again.

you can also disable it entirely, but that comes later.

3 – disable the assistant shortcut

Also called “corner swipe” – that one is hidden nicely. I hate this kind of dark patterns.. I keep triggering it with my hand when I use the phone. The shortcut is swiping up from the bottom right corner of the screen.

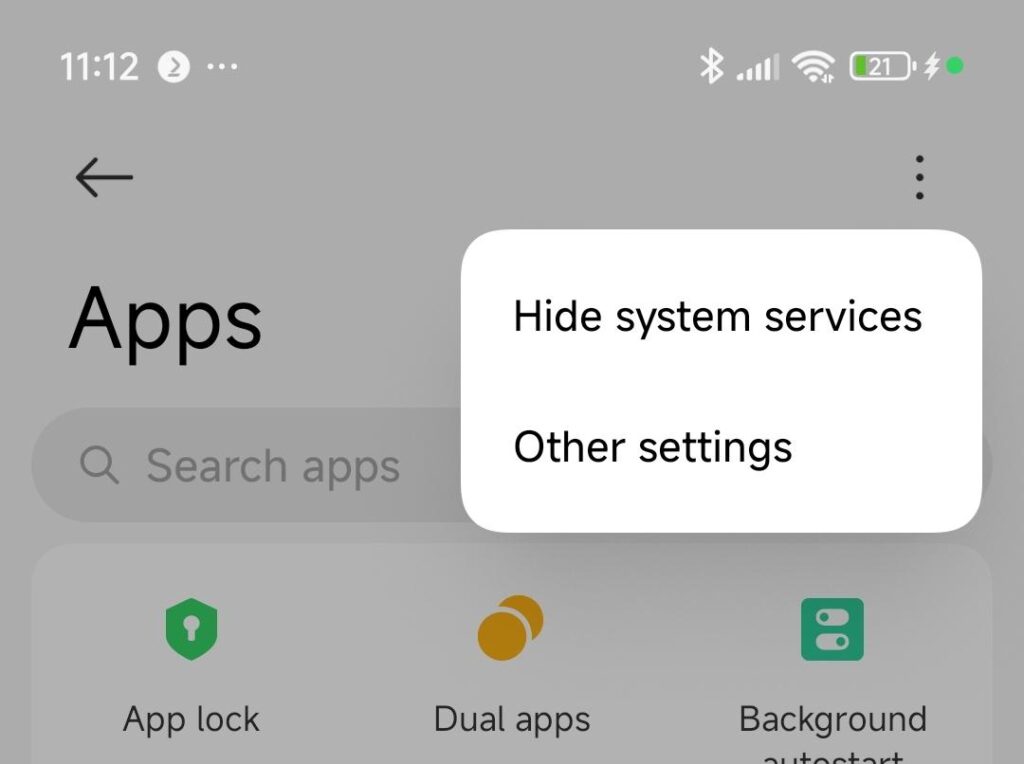
Go Settings > Apps – on the top right corner push the three dots.
select “Other settings”
Choose “Default apps” and on the bottom select “Assist and voice input”
choose “None”

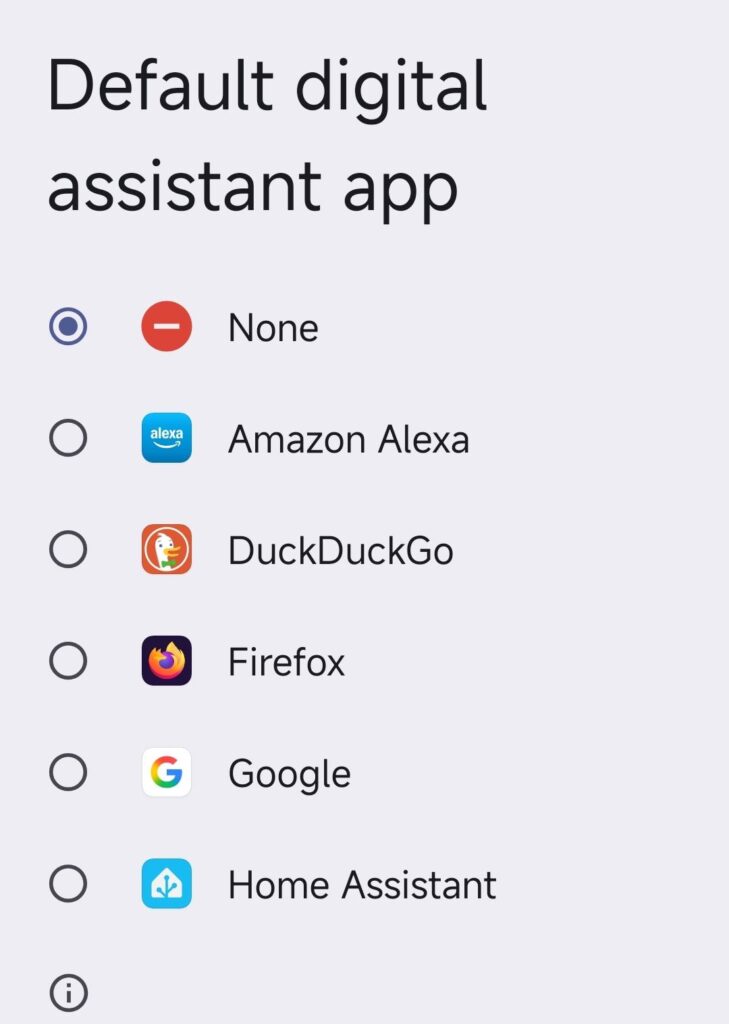
this disables the corner swipe shortcut.

4 – from here it gets difficult.. we will remove google’s assistant entirely

(this is not for the faint of heart.. so only do this when you are not afraid re-installing your phone if it fails)

The problem is: google being google they want you to accidentially trigger and re-activate the assistants. like this:

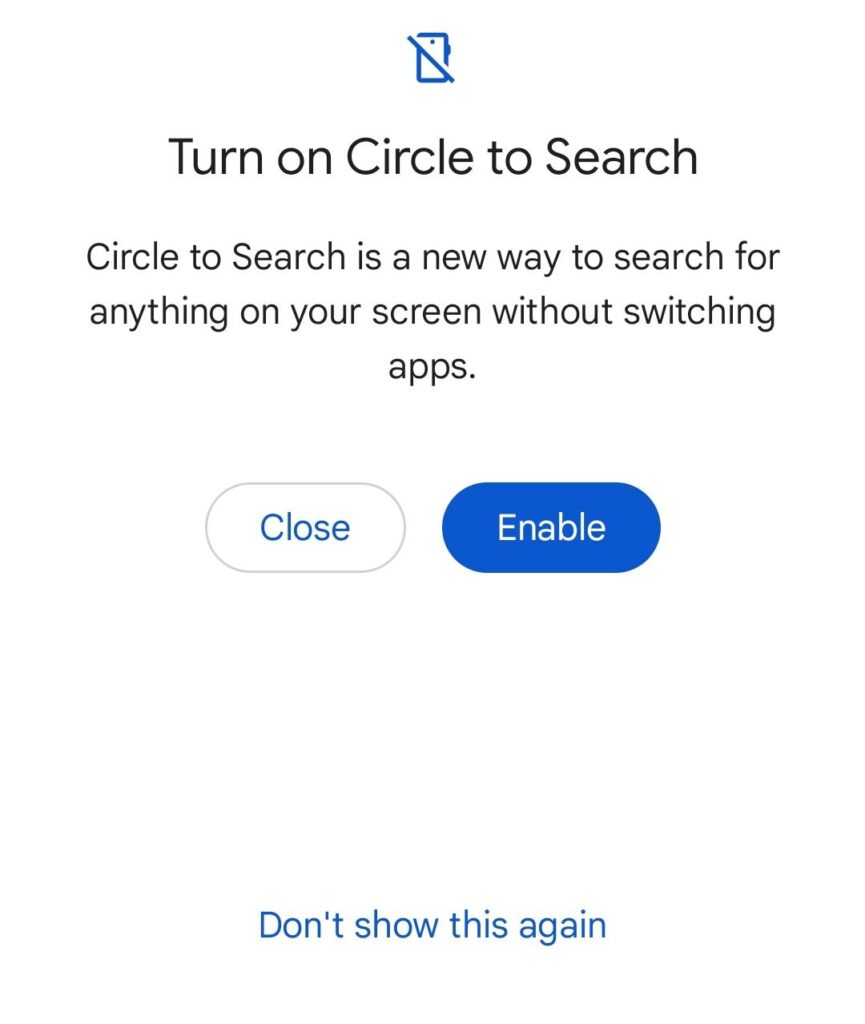
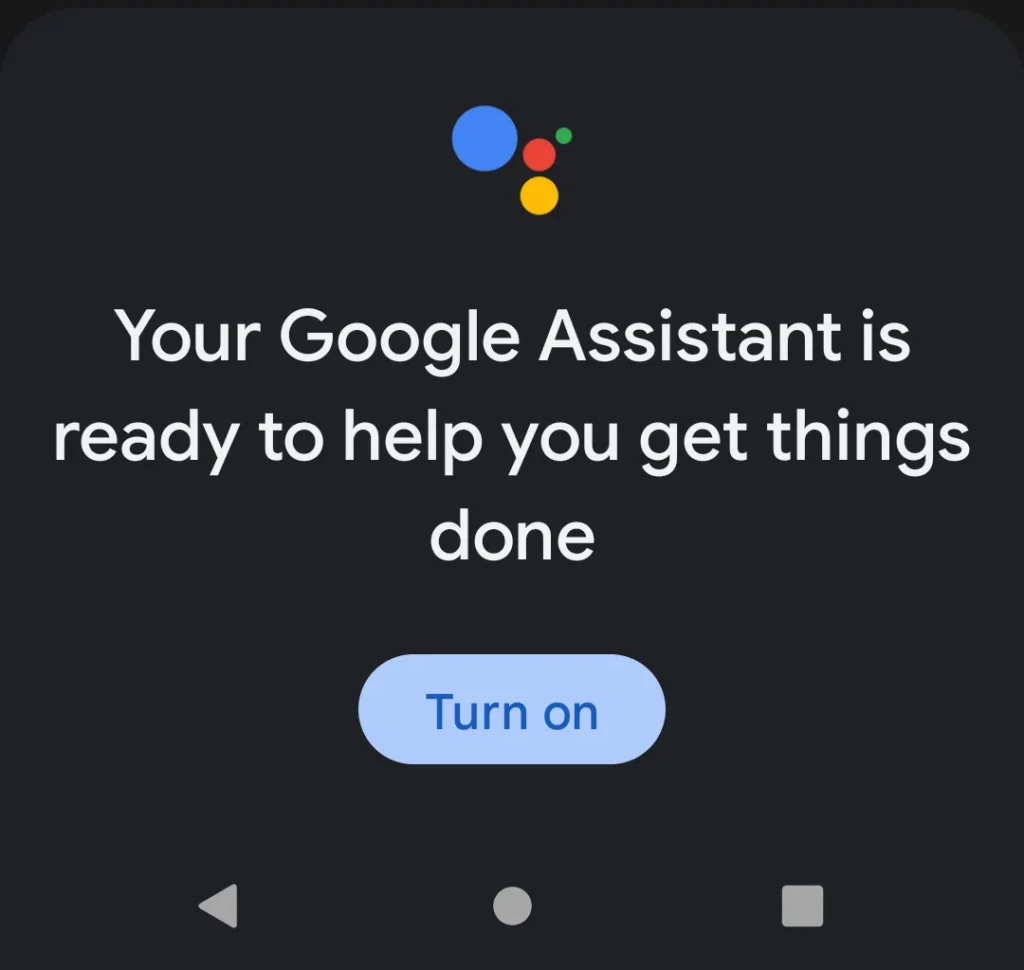
so let’s just tear it out for good. any major update will probably bring this back but then just repeat this step.

First of all: you need developer options enabled in Android. This is a step that can cause your warranty to be void, your phone to catch fire or eat your children.. so.. enter at your own risk.

Go settings > About Phone and tap 10 times on the OS version (sometines the serial number.. this is differnt for every model). Confirm the warning and you have enabled developer options.

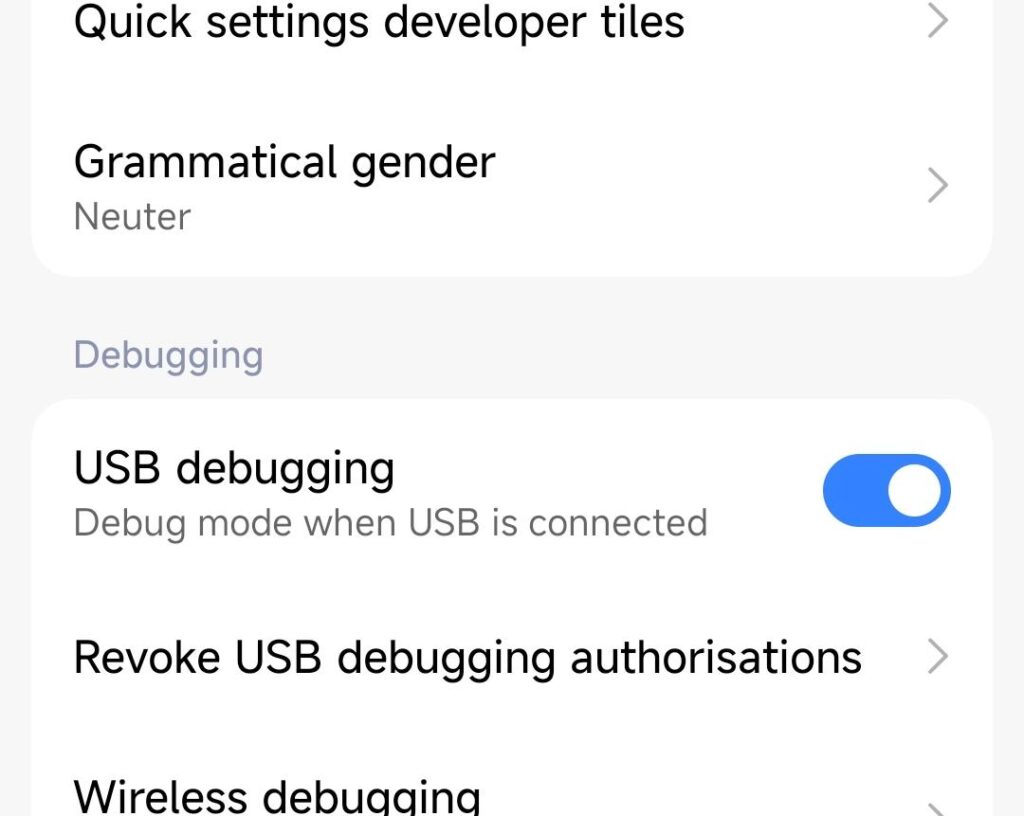
A new option has appeared in settings > Additional settings > Developer options. Go there.

Enable the master switch on top, scroll to the “Debugging” section and enable “USB debugging”

Next, grab a PC, install Android platform tools (windows/linux/mac) and your device drivers.
https://developer.android.com/tools/releases/platform-tools

your phone’s drivers are dependent on the manufacturer. Google’s (for pixel) are here:
https://developer.android.com/studio/run/win-usb

Xiaomi’s (and others) are here:
https://developer.android.com/studio/run/oem-usb
https://bigota.d.miui.com/tools/xiaomi_usb_driver.rar

once installed, go to github and find a “debloat” suite for Android. like this one:
https://github.com/0x192/universal-android-debloater

once you get it to run, find “bard” and remove it. “bard” is Gemini’s internal name. Also search for “googleassistant” and “okaygoogle” – remove them too.

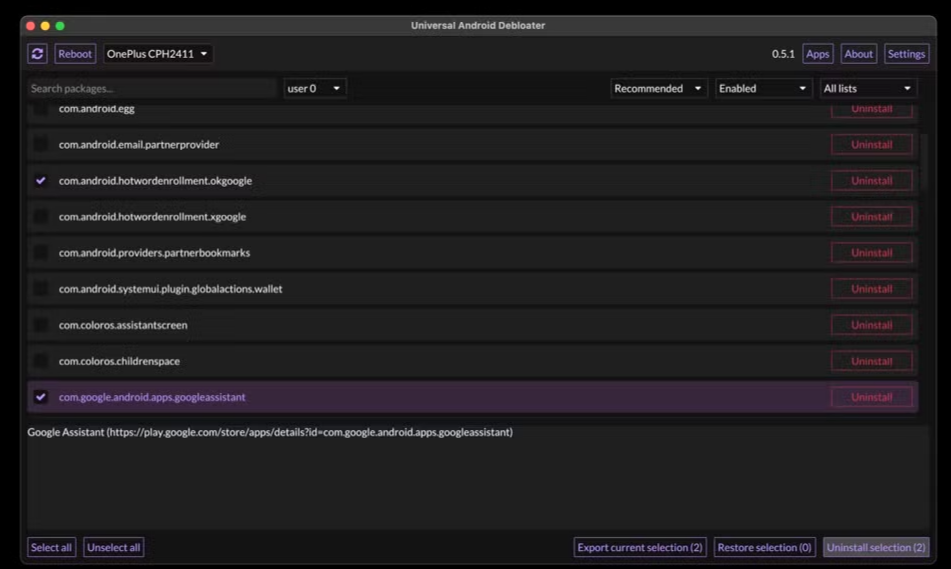
click “uninstall selection” – reboot your phone – cross your fingers and enjoy assistant-free android (until the next software update, when it will come back disguised as someone else or under a different name.. but I will update this post)

google assistant be like…

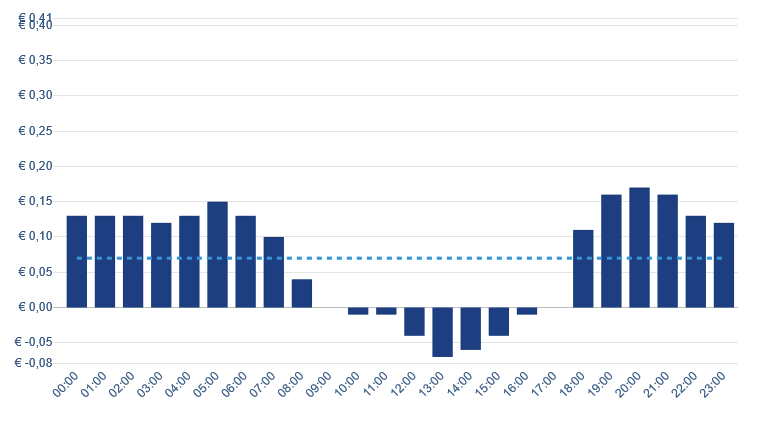
5 – bonus (I will pay you a coffee if you tell me how)

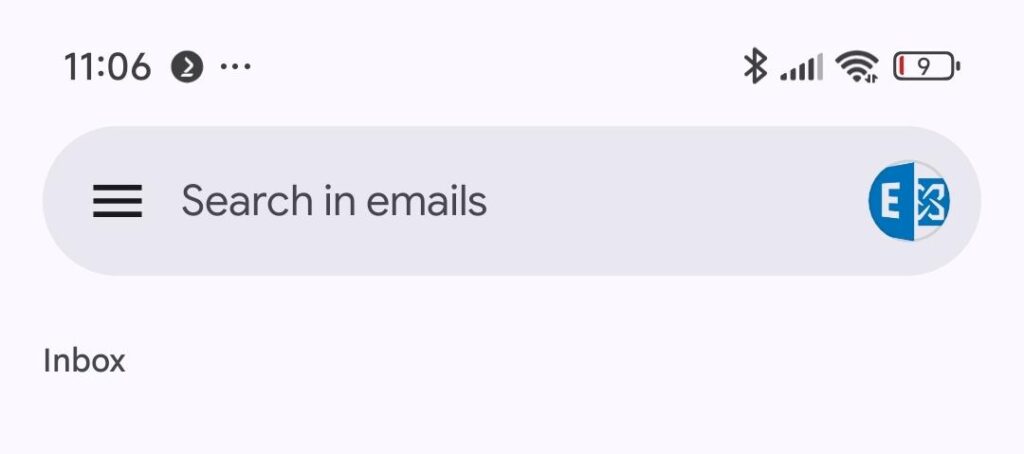
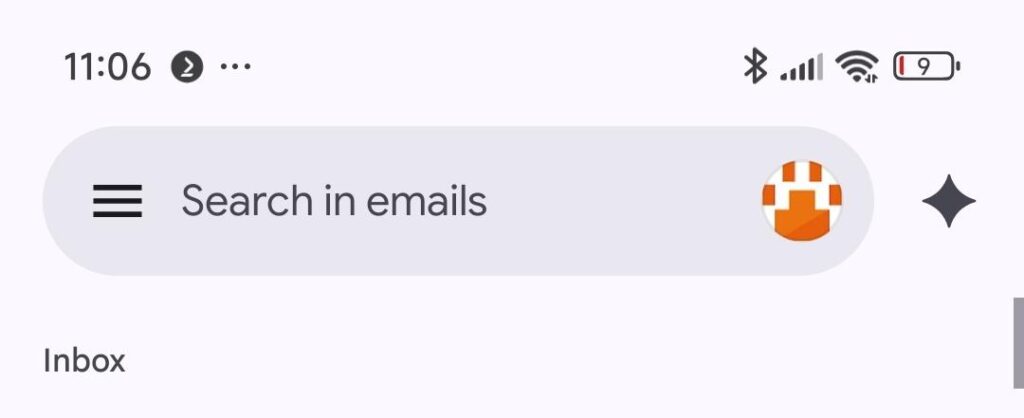
how to remove the AI prompt from Gmail? I found the setting for SMS/Messages but I can’t find the switch for gmail.. and when you swipe up to go through your accounts.. all of a sudden the button shifts to the left and you hit the AI button again. FFS Google.. what’s wrong with you???

yes.. I will charge my phone~

dynamic power and solar panels

using a flexible energy tariff is potentially a disaster waiting to happen, expecially remembering the gas prices during the COVID and the Ukraine crisis of lately.

But if you are smart and willing to invest in sustainability, it can really pay off.

In the Netherlands there is a large amount of photovoltaic and wind power available.. so when the wind blows and the sun is shining.. the grid has too much power and you are getting free.. sometimes even negative energy prices (they want you to get rid of the excess power and reward you for that.) It looks like this:

the prices follow the sun. Nice. If you have a programmable dishwasher, washing machine and you can do certain things (like cooking) during those hours.. your energy is basically free.*

(*it is not free. because you still pay transport and tax on it… but the commercial price is negative so it evens out)

at 15:00 hours I switched on the airconditioning as my appartment had heated up to 30 degrees. Working from home became difficult. Consumed 8,5kWh and paid 75 cents for that. NICE. (highest amount is tax and transport.. the power itself was mostly free) – usually this amount of power would have cost me about 3 euros

but we can do better. putting solar panels on the balcony that produce power in the afternoon and buffering 2.4kW in a battery that can be programmed to buffer and distribute power according to a scheme.. we should be able to get even better.

Also.. that flatline is my baseline.. my NAS, the internet router and the standby of all my not-so-smart devices. How about I use the solar energy to cover that?

the challenge is: using solar panels when everyone else is using them does not give me any benefit.. the energy is virtually free when the sun is shining.. so I should use most of it myself! Even more… injecting it back into the grid (as is the default when you have excess energy) will be penalized.. negative energy tariff means they charge you when you inject power. Let’s not do that.

balcony power – 2 x 500Wp panels and a microinverter

in the winter I successcully used those panels to heat my appartment instead of the conventional stove. the reduction in cost for gas was actually about 800 euros / year. Energy will not be as efficient.. so those panels will never “pay back for themselves” as the Dutch love to calculate.

Also I am using more power in exchange for gas.. I am just lowering the operational cost. The investment never pays off..

5 years of gas and energy consumption with trendlines

it gets better, when you add money to the graphs: this is the price per m3 of gas in the Netherlands for the consumer. This is just scary. (also: Fuck you, Vladi!)

so my heating cost went from 120 a month in winter to 400 a month.. and it got worse for some people with dynamic tarrifs.. so I went and installed a heatpump. More power. less Gas.

Plus: we need a battery. We want to save the energy when the sun is shining and the power is virtually free.

I wanted to get an Anker Solix but it was “only” 1,6kWh.. and the Zendure “all in one” offered 2400Wh. Also..it was supposed to be “bring your own microinverter” and not “use Anker’s inverter or miss out on half of the features”

https://zendure.de/products/aio-2400

pretty smart design, the microinverter has a dedicated space on the top / rear and the rest is self-explaining. Connect solar to battery, connect battery to inverter.

plus: LED color is adjustable. an IMPORTANT feature of current products xD

now this is connected, let’s set up our system. I want to charge the battery as much as possible in the afternoon, then output about 200 watts constantly to cover my baseline.

my calculations suggested that 2400Wh would be just not enough for a whole day.. but I came close. This is the setup when the battery is being charged

once it is full, it disconnects the battery and sends all the power to the grid – and because I dont want to give it away, this is the moment when I switch on my air conditioner or the playstation. because.. free energy. let’s use it :)

and to make it even sweeter.. as the power is most expensive in the evening hours, you can have the system monitor a group in your power distribution or a smart plug in your house.. that way I can have the battery give away more energy when I consume more in the evening.

the setup with playstation and TV on.
my energy price.. between 18 and 22h I want the battery to inject most into my home. Otherwise just serve the baseline.

this all works surprisingly well.. my energy consumption is basically down 20% compared to last month (including using the airco for cooling)

this will probably look not so good in winter, when I need to heat again.. but when the sun is shining I can heat my home with the airconditioner. which should save energy, too.

result:

800 euros less energy cost per year (mostly because of the heatpump) and 20% less “wasted” energy because I use it myself vs. injecting into the public grid.

this is the setup working as intended: the day before was sunny, it charged the battery.. from 2000 on it started discharging and almost got rid of the “baseline” for the next day till the morning. (orange is what my energy broker “expected’ for me… sorry!)

the baseline is almost gone

and when I use the playstation in the evening, the battery takes care of that, but then there is not enough reserve for the night and the next morning.

I want to build this even bigger in my next house.. so I can run the heatpump all day from the battery.. about 24kWh needed for that. that’s a pile or batteries :)

and I read that you can even charge them from the grid if you want. so.. charge the batteries for the house together with your car when it’s cheap. Big project coming up

Mother should I trust…

fun error message that I received today.. citrix related (on Ubuntu 20.04, official citrix receiver install.. or workspace as it’s called now)

turns out the cert is valid, it’s just citrix looking in the wrong places. A simple symlink to the firefox cert store fixes this problem:

sudo ln -s /usr/share/ca-certificates/mozilla/* /opt/Citrix/ICAClient/keystore/cacerts

and another fix for a problem that I don’t really understand… :-/

automated Plex backup 2019 style

2019 – ubuntu is now using systemd (18.04LTS), my home server is running a ryzen processor, CIFS is almost as fast as NFS now and the automated rsync jobs have stopped.
Time to re-build them!
Note: This is a closed system, I am not taking care of security here much as my network is considered “secure” – this is probably not going to win many security awards

Step 1: Networking

Ubuntu 18.04 uses systemd and netplan so no more hacking around /etc/network/interfaces. The config is in /etc/netplan – the default file is 50-cloud-init.yaml

network:
version: 2
ethernets:
enp2s0:
dhcp4: false
addresses:
- 10.0.0.2/24
mtu: 9000

and apply the settings with sudo netplan apply
and verify withip addr
ST,UP,LOWER_UP> mtu 1500 qdisc fq_codel state UP
however, this did not bring the mtu to 9000 so we need another thing:
> sudo ip link set mtu 9000 enp2s0
and from what I hear this may not be transitory / survive reboots.. in that case it needs to go into the startup scripts.
Anyway: that’s what I wanted:
enp2s0: MULTICAST,UP,LOWER_UP> mtu 9000 qdisc fq_codel state UP

Step 2: Mount the NAS

verify shares are working (NFS and CIFS)

andreas@plexcloud:/$ showmount -e 10.0.0.1
Export list for 10.0.0.1:
/shares/public *
/shares/andreas *
andreas@plexcloud:/$ smbclient -L //10.0.0.1 -U andreas
WARNING: The "syslog" option is deprecated
Enter WORKGROUP\andreas's password:
Sharename       Type      Comment
---------       ----      -------
public          Disk      public
andreas         Disk      Andreas sein Zeug

try to mount is manually: (as root because I will mount using fstab later)

root@plexcloud:~# mount -t cifs -o username=andreas,password=xxxxxxxxxxxx,iocharset=utf8,file_mode=0777,dir_mode=0777,soft,user,noperm,vers=1.0 //10.0.0.1/public /mnt/NAS/

root@plexcloud:~# ls /mnt/NAS
[data]

actually. it’s 2019.. I changed my mind wrt fstab.. let’s use automount (As I never know if my NAS will be up or not while I move to my new place)
https://help.ubuntu.com/community/Autofs <<< that’s supposed to be easy?

apt install autofs
edit /etc/auto.master and add the line
/mnt /etc/auto.smb
(which should tell autofs to look at /etc/auto.smb and perform its magic in /mnt) – basically mounting SMB shares in the /mnt directory. CIFS would be a better way.. which doesn’t work for me.. so it’s the manual mode for me for now

for the lazy me: edit fstab and add:
//10.0.0.1/public /mnt/NAS/ cifs username=YOURUSERNAME,password=YOURPASSWORD,iocharset=utf8,file_mode=0777,dir_mode=0777,soft,user,noperm,vers=1.0
vers=1.0 is to bypass the “host is down” error (assuming proper authentication should be used) and the rest is to bypass said authentication and not to fuck around with file permissions (just behave like a fucking USB stick, damn it.. no one else is using you!)
yeah, I know.. “guest” would probably work, too.. but I had bad experiences with permissions afterwards.

so now I have a mountpoint, let’s do backups!

Step 3: test and automate rsync jobs

motivation: rsync with delete – whatever I delete from the source can be deleted on the backup, too
full sync for the server directory, only check by size for the media files
I like -v and “–progress” as it gives me an indication what is going on (on the first run…)
however not in the scripts, a simple –stats will have to do, there…

so for the server backup:
rsync -ahv /var/lib/plexmediaserver/ /mnt/NAS/backups/plexmediaserver/ --progress --delete --stats --dry-run
non-verbose and “live” mode:
rsync -a /var/lib/plexmediaserver/ /mnt/nas/backups/plexmediaserver/ –delete

(I removed the -z because the data dir is 7 GB and the compression too too long on that stupid atom-based nas)

and for files:
rsync -ahv /plex/ /mnt/NAS/plex/ --progress --size-only --delete --stats --dry-run
and non-verbose:
rsync -aq /plex/ /mnt/NAS/plex/ --size-only --delete

first version of the script used copy but this took AGES to finish so rsync all the way now. After all it seems my old seagate NAS does rsync :D

the /var/lib/plexmediaserver dir still takes way too long.. so I will tar and zip it and rsync it over instead – much faster – also –delete-source-files is handy (as mv can not overwrite and I don’t feel good calling rm -rf in a script executed by root….)

tar -zcvf plexmediaserver.tar.gz /var/lib/plexmediaserver/

finished script: added to crontab

0 4 * * * cd /home/andreas && sh backup_plex.sh>>plex_backup.log

#!/bin/bash
echo "+++stopping plex media server"
systemctl stop plexmediaserver.service
sleep 5
echo "+++backing up server and cache"
#rsync -ahz /var/lib/plexmediaserver/ /mnt/NAS/backups/plexmediaserver/ --stats --delete
tar -zcf /opt/plex/plexmediaserver.tar.gz /var/lib/plexmediaserver/
echo "+++copying tarball over to NAS"
#rsync -ahv /opt/plex/ /mnt/NAS/backups/plex/ --remove-source-files --progress --stats
rsync -ah /opt/plex/ /mnt/NAS/backups/plex/ --remove-source-files
echo "+++restarting plex media server"
systemctl start plexmediaserver.service
echo "+++server backup complete - now for the files"
#rsync -ahv /plex/ /mnt/NAS/plex/ --progress --size-only --delete --stats
rsync -ah /plex/ /mnt/NAS/plex/ --size-only --delete

SDcard format

when you need to format a sdcard for windows (phone) in linux:

sudo mkdosfs /dev/sdc1 -s 64 -F 32

-F is filesystem (32 is vfat/FAT32)
-s is the allocation size multiplier (for disks < = 16 GB it's usually based on a sector size of 512byte) how to find out sector size? fdisk! root@lando:~# fdisk -l /dev/sdc1
Disk /dev/sdc1: 1.9 GiB, 1973416448 bytes, 3854329 sectors
Units: sectors of 1 * 512 = 512 bytes
Sector size (logical/physical): 512 bytes / 512 bytes
I/O size (minimum/optimal): 512 bytes / 512 bytes
Disklabel type: dos
Disk identifier: 0x00000000
root@lando:~#

16×512 = 4K allocation size (standard for small cards)
64×512 = 32K allocation size (Lumia Phones from 4 – 32 GB)
(larger cards (64 GB and up) need exFAT and 128 kB allocation size for Lumia)

NOTE: for larger sector sizes you have to change the formula accordingly

5 things for better security

following the Snowden events here is what everyone can do to increase privacy/security and prevent man-in-the-middle attacks:

– tor
– otr encryption / GPG email / chatsecure / signal
– password manager and a strong password policy
– 2-factor authentication
– full-disk encryption

Continue reading

centOS 7 install log

after my last server install I realized a lot of things were improvised and broken, also there were no new binaries for owncloud on Ubuntu 12.02 and no disk encryption and no systemd and so on and as I want to learn something I wanted to match it with my new love for Fedora so it became a Centos7 server.

basic vmware install using vSphere I found the first bug: using full disk encryption I cannot boot anymore

reason is a known bug

At the GRUB boot menu, press e to edit the boot config and remove rhgb.
then disable it permanently by removing rhgb in /etc/default/grub and execute grub2-mkconfig -o /boot/grub2/grub.cfg to update your boot grub.cfg.

next thing was I could not enter the passphrase using the vSphere console as characters were autorepeated.

Solution via VMware

  1. Power off the virtual machine.
  2. Add a line, similar to this, at the end of your virtual machine’s configuration (.vmx) file:
    keyboard.typematicMinDelay = “2000000”
    The delay is specified in micro-seconds, so the line in the example above increases the repeat time to 2 seconds. This should ensure that you never get auto-repeat unless you intend it.
  3. Power on the virtual machine.

that out of the way I could boot up CentOS and update it and install vmware tools

yum install net-tools perl
mount /dev/cdrom /mnt/cdrom
cd /tmp
tar zxf /mnt/cdrom/VMwareTools-5.0.0-<xxxx>.tar.gz
umount /dev/cdrom
cd vmware-tools-distrib
./vmware-install.pl

Now, let’s get started.
First get EPEL started (Extra Packages for Enterprise Linux)
yum install epel-release

enable UTF-8 support
edit /etc/environment and add this:
LC_ALL=en_US.UTF-8
LANG=en_US.UTF-8

also use ‘localectl’ to show and set a different locale
like this:
localectl set-locale LANG=en_US.utf8

colorize bash:
add this to .bash_profile
export LS_OPTS='--color=auto'
export GREP_OPTIONS='--color=auto'
export TERM=xterm-color
#export GREP_OPTIONS='--color=auto' GREP_COLOR='1;32'
export CLICOLOR=1

install Mosh
yum install mosh htop
then allow UDP for ports 60001-60010
sudo iptables -I INPUT 1 -p udp --dport 60001:60010 -j ACCEPT
so in systemd this will be:
– create /etc/firewalld/services/mosh.xml

< ?xml version="1.0" encoding="utf-8"?>

MOSH
Mosh (mosh.mit.edu) is a free replacement for SSH that allows roaming and supports intermittent connectivity.

– firewall-cmd –add-service=mosh –permanent
– firewall-cmd –reload
Note: In Fedora21+ this is already present (the xml file for mosh)
this will open 10 ports but that should be more than enough for me.
and start mosh as a server using “mosh-server” – defaults should work fine!
I am not even sure this is needed.. as long as mosh is installed on the server it should connect via SSH and start mosh and hand over the connection!

htop
yum install htop

fail2ban
yum install fail2ban
then make a copy of /etc/fail2ban/jail.conf and save it as jail.local
there set at least this:
[sshd]
enabled = true

enable and start service
systemctl enable fail2ban
systemctl start fail2ban

check journalctl for selinux related issues but this should be fixed now
journalctl -lfu fail2ban

install basic developer tools (build-essentials)
yum groupinstall 'Development Tools'